


How to Make Your Driver Digitally Signed to Work Across Multiple Windows OS Versions Upon the Latest Changes in Certificate Standards
Software compatibility is a core value and a major concern here at Morphisec. Deploying for multiple clients with various environments requires us to maintain our product compatibility on all levels with operation systems as old as Windows 7 all the way to the newest Windows 10 with its latest updates. Alongside the expected improvements under and over the hood of the popular OS, Microsoft went a long way to make sure that the drivers you install on your system are approved, compatible and above all – safe – by requiring a certified digital signature on every driver file installed. Every few versions and updates, Microsoft publishes a new, stricter, standard for these signatures, requiring driver developers to adjust to the new requirements.
Most users would not even notice these changes. Microsoft incorporated a simple backward compatibility mechanism, so that not only are already-installed drivers not affected by these changes, but old-timers in the industry are still able to use their existing certificates and signed artifacts in future releases without the need to change their existing pipeline.
Newer players, however, and specifically those holding a certificate issued after July 2015, are required to adhere to the newest standard, enforced by the latest 1607 update to Windows 10 (aka The Anniversary Update) and published by Microsoft on July 2016. This new standard requires driver publishers to possess not only an Extended Validation Certificate, but the signed driver file must also be sent to Microsoft, using one of Microsoft’s dashboards, to be signed again by Microsoft themselves. Any machine running a freshly installed copy of Windows 10 with this update will only install drivers signed with both an EV Certificate AND Microsoft’s Certificate.
Sounds easy enough, doesn’t it? Unfortunately, like most new processes, the road towards exactly the right kind of signature is left with many dark corners and undocumented prerequisites. We found ourselves combining numerous guides on various topics tackling different obstacles along the way. Thus we felt obligated to contribute back to the community and give you our own two cents on the matter. This is by no means The A-Z Ultimate Guide on Digital Signatures, but we hope this short “developer's diary” will help others on their way to properly sign a cross-version Windows compatible driver.
New Standard Digital Signing
So there we were, looking up how to sign our driver with Microsoft’s certificate according to this new standard. The first option that came up was using the “Create driver signing submission” options at Microsoft’s SysDev Dashboard. This is a simple, fast way of making your driver files install and run on the latest Windows 10. However, appending the additional signature in this manner will make your driver incompatible with the older Windows 7.
One solution would be to generate two packages. Sign your files with your EV as usual and send them using the Dashboard to add the extra signature according to the new standard. When the files are signed you can download them and you will have two copies of your driver files – one with only your EV and compatible with Windows 7 and the other with the appended signature and compatible with Windows 10 (You will have to make sure which package should go to which Windows version in between. Most will work with both methods).
If this method works for you, or if you wish to just generate your Windows 10 compatible package, we would recommend you to go through Chris Lüders’ article “Getting a kernel mode driver signed for Windows 10,” which will take you through the steps of this particular method. Make sure to read it carefully, for the process does not give error messages along the way. If your submission is for some reason declined, the process will just seem to be stuck. The signing process itself should take about 10 minutes from the moment you send your files to the point where you can download the signed package. If the progress bar does not budge for a half an hour or so - email sysdev@microsoft.com with your submission number and ask for help. They are quite responsive and will send you the error message so you can identify the problem.
Cross-Version Compatible Digital SignatureS
We could’ve settled for the dual versions solution. However, besides the clutter it may leave in our pipeline, we also fear that installing a driver on a currently running Windows 7 machine might come back to haunt us. Sure, if the machine is ever updated to Windows 10 it will not be considered “freshly installed” and thus not enforce the new standard, but what if Microsoft ever published another Windows 10 update that enforces the new certification standard even on such updated machines? We were still looking for a solution that would work seamlessly across this Windows versions span with a single file. And if you’re still reading this, you probably are too.
To achieve this, the simple Driver Submission tool is not enough. As mentioned in Microsoft’s above-mentioned announcement:

In a nutshell “all you need to do” is to run locally Microsoft’s compatibility tests across all environments you wish the driver to work in. Yes, that means having a dedicated test machine for each Windows version needed. You will also need two extra machines - one for the HCK controller and another for the HLK controller. Then you will install the HCK and HLK clients on the proper machines, along with your own driver. You run the tests and pack the produced results alongside your signed driver files and an INF file in a special package in a specific way, sign it too with your EV and send it to Microsoft using their NEW Dashboard.
Sounds fun, right? So let’s dive into the details of this process step by step.
Setting Up the Controller
Download the latest HCK and HLK. You will need both because each runs the tests on a different group of Windows versions. Both need to be installed on a Windows Server machine, but we found the HCK Controller wouldn’t install on our Windows Server 2012 machine, as the controller did. So we installed the HLK Studio and Controller on a Windows Server 2012 machine and the HCK Studio and Controller on a Windows Server 2008 machine.
Setting Up Test Environments
Once you have the Controllers up and running, it is time to prepare the test environments. We prepared 11 different machines, running the latest Windows 7, Windows Server 2008 R2, Windows 8.0, Windows 8.1, Windows Server 2012 R2, Windows 10 and Windows Server 2016. Since our driver comes in two flavors - for 64bit and 32bit systems - we made sure we had both types of systems for all supported versions so both versions of our driver will be installed and tested.
Now, one may wonder - we started this voyage on a quest for a certificate that would allow us to install our driver on Windows versions that are already enforcing the new certificate standard, yet in order to achieve this we are installing that very same old standard signed driver on those very same OS versions themselves. There may be more than one way of achieving this, but we did it by manually turning off Certificate Enforcement and running Windows under Test Mode. You may wish to do this for all your machines, just to avoid any unfortunate errors along the way.
Our preferred method of turning Test Mode on was running, with Administrator privileges, these two simple commands on Windows Command Line:

Note: You might need to disable or suspend BitLocker and Secure Boot on the machine before running these commands.
The command line should return an approval output for each line and after restarting Windows should indicate it runs under Test Mode right on your desktop:
Time to install the HCK\HLK Clients: We installed the HCK Client on our Windows 7, Windows Server 2008, Windows 8.0, Windows 8.1 and Windows Server 2012 machines. The HLK Client was installed on the Windows 10 and Windows Server 2016 machines.
The installation of the Clients is already on the Controller machines. Make sure that the Controller machines are reachable from the test machines. Turn Network Discovery on and either open the required ports or turn off your Firewall altogether.
Open the File Explorer and locate the proper Controller machine under Network. When you go inside you should see a few shared directories:

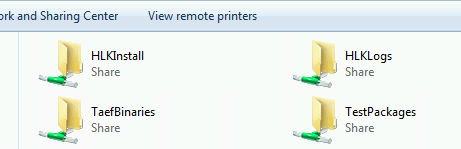
As you probably guessed, go into the HCKInstall or HLKInstall directory and then into the Client Directory and run Setup.cmd for the HLK Client or setup.exe for the HCK Client:

This should take care of installing and configuring the Client. When the installation is finished, go ahead and install your own driver. Your machine should now be ready to go.
Running The Tests
The process of preparing and running the HCK and HLK tests is basically the same. Start the HCK\HLK Studio:

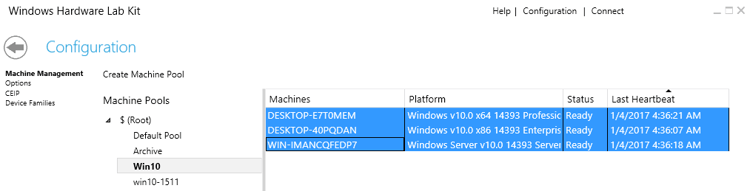
The first thing you should do is configure your Machine Pools. Click the Configuration button on the upper right corner. You should land on the Machine Pools configuration dialogue. You will see a list of available pools (currently only Default Pool is present). Every new machine you install the Client on will first appear in the Default Pool. Unfortunately, you cannot use this pool for tests. Create a new pool and drag the machines you want to use from the Default Pool to your new pool. Note that you can create different pools to maintain order as you desire, but as a rule of thumb just keep all machines that should run the tests together in the same pool.
After you make sure that all your machines are in a new pool, go to the machine list of that pool, select all the machines, right click on the selected list and choose Change Machine Status → Ready. All your new machines should now initialize and finally be ready. If you’re missing a Client or you have a stubborn Client that won’t respond to the initialization request you can try going back to that machine and restarting it. The Client will always send a fresh Heartbeat on startup, which might just do the trick.

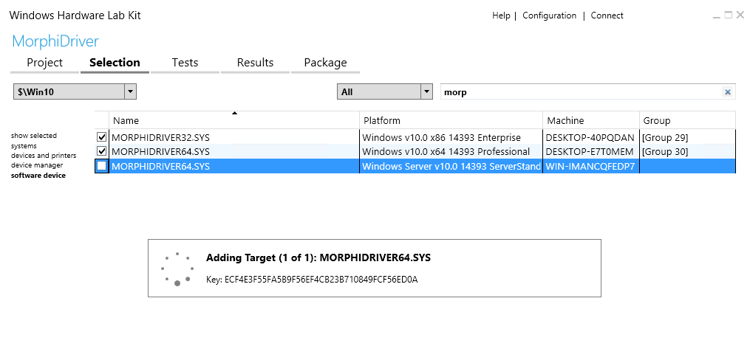
When all your test machines are Ready, go back to the main screen and click Create Project. Give your project a name and continue to the Selection dialogue. Choose the pool you wish to use, the device type of your driver, and look up your driver using the search field if necessary. Select all the versions of your driver you want to include in the test and continue to the Tests dialogue.
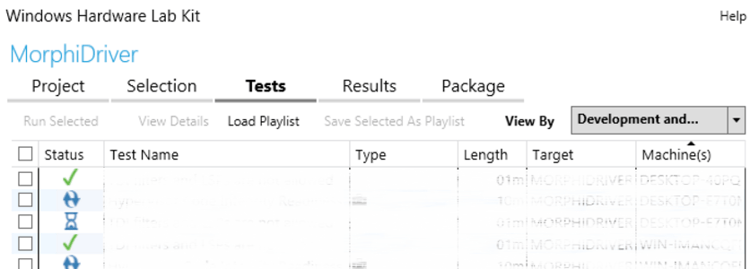
Here you can choose which tests you want to run. Most likely you want as many tests as possible to send to Microsoft, so select all and click Run Selected. If you have a specific group of tests you wish to run, you can also save that list for later use.
In the Results dialogue you can follow the actual run and see the results as each test is finished.

If some tests fail, don’t lose hope just yet. Some of the tests are problematic and Microsoft is aware of it. They publish official HCK Test Filters and HLK Tests Filters which, when applied to your tests results, will deal with the problematic tests. Download and apply them to your tests. Hopefully, your test results are now in the green and you are ready to prepare your package.
Go to the Package dialogue. If, like us, you need to combine both HCK and HLK Tests, just click Create Package, choose “Do not sign”, and save it somewhere you can access for the next stage, so you will have two packages, one for each tests type. We will deal with the rest of the package requisites when creating the merged package.
Merging HCK\HLK Packages
All you have to do now is merge the two packages into a single package that includes your tested driver files with your EV signature and INF file, sign the entire package with your EV certificate and submit it to Microsoft. Because you need the EV signature on the package as well, make sure you do this merge on a machine that is capable of signing it with your EV certificate. In our case, this couldn’t be done on any of the Controller machines, so we installed another copy of the HLK Studio only on our signing machine.
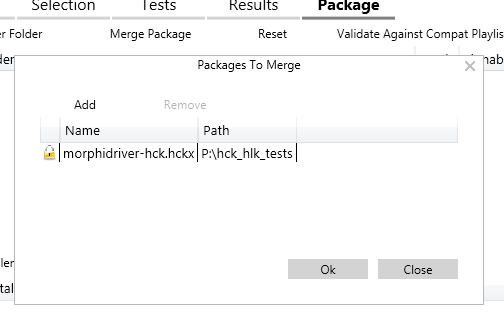
To merge the test results, open the HLK Studio and Connect to the package you produced at the previous stage. When the package is loaded, go straight to the Package dialogue and click Merge Package. Add your HCK package and confirm. You shouldn’t see any visible confirmation for the merge on the main dialogue, but if you click Merge Package again you should see your package in the list as it is ready to be merged into the new package.
Now, to prepare the driver folder, create a new dedicated folder and put inside the driver files you’ve tested across all environments. You will also need to add an INF file. If you are already using an INF file with your product, just use it. Otherwise, you will need to generate a minimal dummy INF file.
It should look something like this:
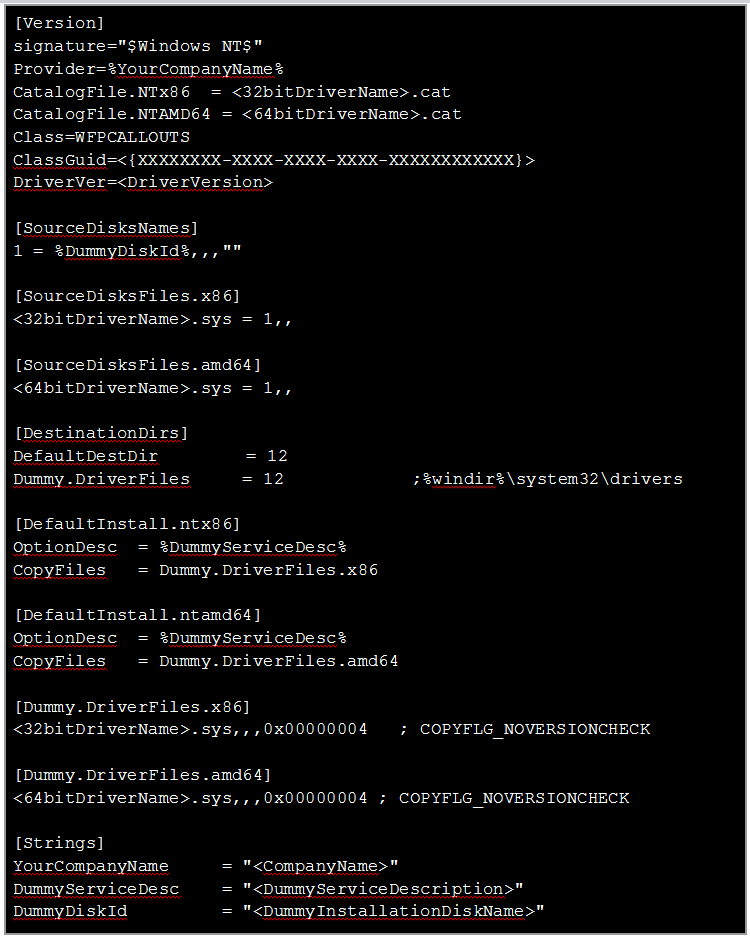
After you edit it to fit your own driver with the proper variables, you can run a simple check to make sure the INF is ready. If you have WDK 10, you can find it under the “tools” directory. Just run it from Command Line with the path to your INF file as a single parameter. It will output any error or warning, but finishes silently when none is found.
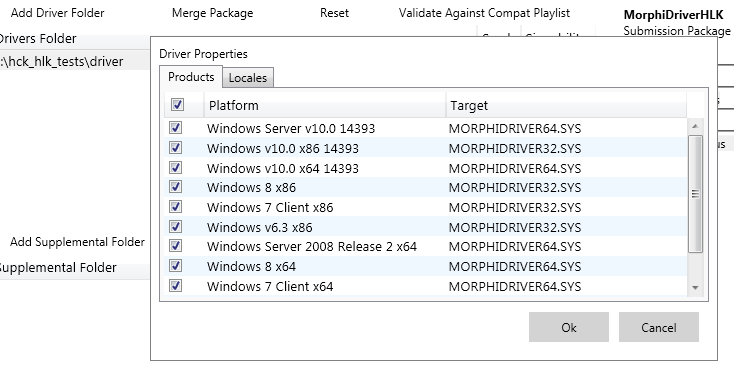
Once you have the driver folder, with driver files and the INF file inside, go back to the HLK Studio and click Add Driver Folder. Locate your driver folder in the tree and choose it. You will be prompted for requested Products and Locals under the Driver Properties window. Feel free to choose them to your liking.
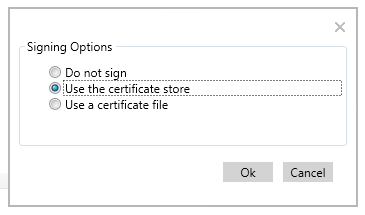
Once you accept, you will notice the folder path in the Drivers Folder list. Make sure everything looks fine and go ahead and click the familiar Create Package button. This time, we want to sign the final package with the same EV that we signed the driver files inside it. Do it by choosing your signing method and following the dialogue that follows.
Note that this is not an actual Digital Signature you can see in the package file Properties. It adds the certificate to the package itself. This package is all you need. It is time to hit the Dashboard.
Submitting to Microsoft
Remember the SysDev Dashboard we mentioned earlier? Well that is the OLD Dashboard. When we tried submitting our HCK\HLK Package there, all we received upon submission is an error message telling us we should use the NEW Dashboard for these kinds of requests. The new Windows Hardware Dev Center dashboard is another service, with a different sign up process. You will have to sign up, send your EV Digital Signature and agree to Microsoft’s legal agreements. You are going to actually send Microsoft your product or a part of it, so you might want to take the time and understand their meanings. You will not have any other way to distribute your driver once the new standard becomes absolute.
Once you’re inside the Dashboard, go to the Hardware section and click Create New Driver. You should see a progress bar, a field for your Driver Name and an upload area for your merged package.
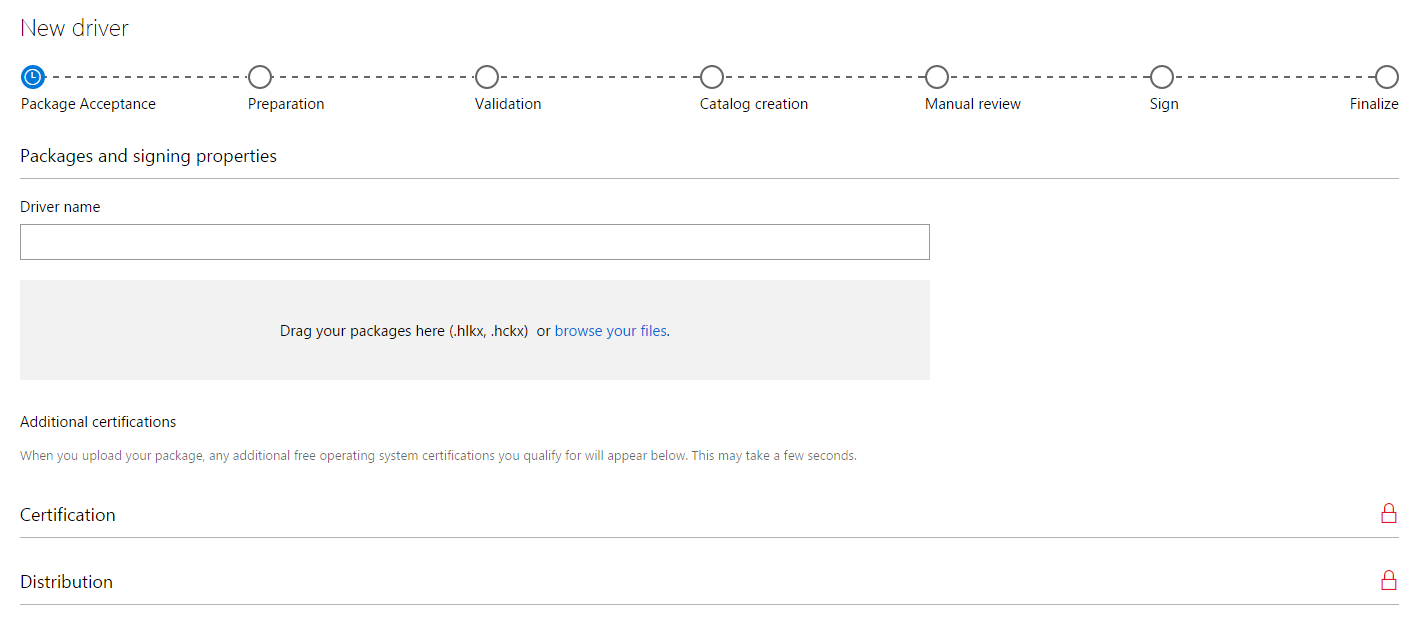
Once you drag your package file into the field, it will automatically be uploaded and start being processed. You will see new sections and fields appearing depending on the results of this processing, which you should fill according to your own driver properties. Don’t forget to fill in the Name field and submit the complete form. This will allow the processing to continue and eventually complete.
The progress bar here is quite informative and you will see immediately if there is any problem with your package, for example:

SHA-256 Compatibilities Issues
An interesting point to note is that Microsoft differentiates between Windows versions, but for each version they will not regard a specific update. This is important, for instance, because somewhere along the way, the industry started using SHA-256 Signatures (and in some fields even deprecated SHA-1 Signatures altogether). Microsoft published an update for Windows XP, Windows 7 and Windows Server 2008 R2 to add SHA-256 support to the previously SHA-1 exclusive OSs, but submitting a SHA-256 signed driver for Windows 7 compatible certificate will still fail with the following error:

There are two factors in the digital signature process that use this terminology, and it is common to confuse between the two. There is the matter of the certificate encryption itself. Old certificates were generated using the SHA-1 hash algorithm while new ones, EV included, are generated using SHA-256. Since we desire to install our driver on newer OSes which require EV certificates, we will always sign using our SHA-256 EV certificate.
The error shown above did not occur because of a SHA-256 certificate, but because of using a SHA-256 signature. Our certificate is used to sign on the driver, and that signing process can also be done using SHA-1 or SHA-256 hash algorithms. Signing your SHA-256 certificate using a SHA-1 digital signing method will allow you to pass this constraint and you will get Microsoft to append it’s signature on top of it to produce a viable package.
If, however, you wish to use your certificate with a SHA-256 signature, you should be prepared to sign twice – sign your driver once using the SHA-1 algorithm and then append a secondary signature of the same certificate using a SHA-256 signature.
The commands you need to invoke should look like this:

And if all is well, the digital signatures tab in the result file properties should look like this:

This way, your driver should be compatible with Windows XP and Windows 7 (which cannot recognize the appended signature anyway) but still hold the SHA-256 signature. When you send this to Microsoft, the dashboard will recognize the SHA-1 signature and accept it as compatible with the older Windows versions. It will then append Microsoft’s signature, so the final package will in fact hold three signatures and comply with all Microsoft’s requirements along the years.
Success!
When you finally get these 7 dots greener than the neighbor’s grass - your driver is ready. You can download it by expanding the grey information area where you will find the Download signed filed button.
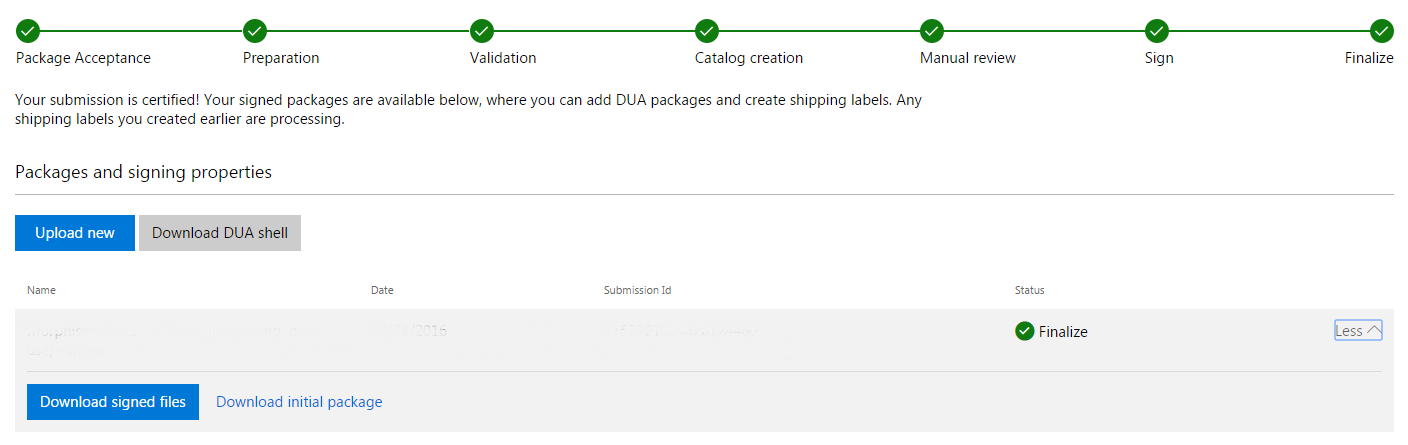
If you so desire, this is also where you can use Microsoft’s Windows Update distribution services right at the bottom of this page, but our own voyage ends here.
Afterthoughts
So this is it. After you get all your testing environments ready and you manage to smooth all the quirks along the way, the signing itself is the easy part and can be reproduced quickly when the time comes to publish a new driver version. It is still somewhat long for a signing process, but the length Microsoft went to verify the compatibility and safety of all drivers installed on one’s OS is admirable, even if some may argue on the matter of whose responsibility it actually is.
The process of achieving this feat for the first time should be more clearly documented, especially with different yet similar processes with documentations still out there on the web which can easily confuse someone who’s not familiar with them.
We would also love to see some automation support for this entire process. Some API to run as part of our release pipeline would make our DevOps enthusiasts happy. We can only assume some parts of this process can be automated one way or another, but we didn’t find any clear documentation of it up to date. Maybe someday we will connect the dots and automate this process, but this will be a subject for an entire new blog entry.
For now, we do hope this walkthrough can help others get out of this maze of tools and services faster and smoother.
Good luck!
Resources:
- Driver Signing changes in Windows 10, version 1607
- Update on Sysdev EV Certificate requirement
- 5 Things about Code Signing on Windows10 you need to know - Acmetek.com
- How do I disable driver signature enforcement win W10 preview?
- InfVerif Tool
- Microsoft Security Advisory 2949927
- Microsoft Authenticode - Dual Code Signing Instructions with SHA1 & SHA256 hashing Algorithm

.png?width=571&height=160&name=iso27001-(2).png)